Here is part 2 of my sock pattern. This is the heel and the leg. The heel always sounds intimidating but it is really easy I promise!
 |
 |
Collecting all data
So let's start by getting all data again.The heel part 1
 |
| Where we left off |
So now you flatten your sock from the toe up. You now work to the nearest side. It will look like this:
 |
| Worked to the side |
Now chain 1 and turn. Sc .
Chain 1 again and turn. Sc -1. Chain 1 and turn again. Keep scing to the end of the row-1 until you have stitches.
It now has the shape of a pyramid.
 |
| The pyramid heel |
The heel part 2
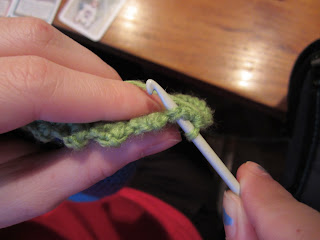
Now this part may sound hard at first but I'll explain with pictures below. It is really easy! If you don't understand it at first just read the pictures and try reading it again.You will stitch one in the row below. But because it is a row below a hole will appear.
To counter that we will first insert our needle in the side of the row, yarn over an pull through. You should now have two loops on your hook. Now you insert your needle in the row below, yarn over, pull through, yarn over and pull through all loops. If you still have a hole on the side pull up one loop extra between the two rows.
 |
| Pulling up a loop on the side of the first row |
 |
| Pulling up loop in the stitch one row below |
Now slip trough the side of the row you just sc in and turn. Skip slipped stitch. Sc to end of the row. Pull up one loop on the side of the row. Pull up one loop on the sc below, yarn over, pull through all loops. Sl in side of row. Turn.
Repeat this until you picked up all stitches on the sides.
You will now have stitches around again. You may have a few too little or too many. Don't worry about that. Just increase or decrease a bit in the next row instead of working in the round and you will be fine.
 |
 |
The leg
This will be really easy again. Just continue working in the round until you think your sock is long enough. Normally the leg is as wide as the foot itself. If it is smaller or bigger you can increase where necessary. I can not generate this part because every leg is really different. But I would recommend just using stitches. If you decrease for a smaller leg, make sure the leg part still fits over the heel. I find that decreasing too much makes the hole too tight. This makes it impossible to put the sock on even though it fits nice around the leg.So to make sure the end of the leg is stretchy I often make a ribbed border.
The border
I often make a border with 2 FPDC and 2 BPDC.Border row 1: Ch 1, 2 FPDC, 2 BPDC. repeat all around
Border row 2: Repeat row 1. Sl in next stitch, finish off. Now you have a nice sock. and you are ready to make the next!
Finished
 |
 |
| The ribbing has been stretched a bit bit still fits nicely | If you work in the ends the toe becomes less pointy I promise! |
So I hope it works for you! I would love to hear how it works out for you.
If you have any questions, don't hesitate to ask!
Love,
Little Mouse

No comments:
Post a Comment